目录
1. 概览
版本控制系统(VCS) 版本控制系统是用来记录一个或若干个文件内容的变化,以便将来查阅特定版本修订情况的系统。版本控制系统不仅可以应用于软件源代码,还可以对任何类型的文件进行版本控制
版本控制系统的分类
集中式版本控制系统,比如 SVN
集中式版本控制系统使用单一服务器集中管理所有文件的修订情况,客户端只能获取文件的某一版本(比如最新版本)的快照(集中式版本控制系统通常具有全局递增的数字版本号)
缺点:
- 中央服务器单点故障
分布式版本控制系统,比如 Git
客户端将存储库完整地镜像下来,即每个客户端拥有文件的所有修订版本。分布式版本控制系统的操作可以分为两类:
- 对本地存储库的操作,比如使用
git commit将修改提交到本地存储库 - 对远程存储库的操作,比如使用
git push将本地存储库的更新推送到远程存储库上
- 对本地存储库的操作,比如使用
2. 搭建 Git 测试服务器
下面在 CentOS 7.9 上搭建 Git 测试服务器。
安装 Git
xxxxxxxxxxsudo yum install -y git curl curl-devel expat expat-devel gettext gettext-devel openssl openssl-devel zlib zlib-devel perl perl-devel创建用户和组
xxxxxxxxxxsudo groupadd gitsudo useradd git -g git -s /bin/bash将客户端的公钥添加到 git 用户的
$HOME/.ssh/authorized_keys文件中xxxxxxxxxxsudo mkdir -p ~git/.sshsudo touch ~git/.ssh/authorized_keyssudo chown -R git:git ~git/.sshsudo chmod 600 ~git/.ssh/authorized_keyssudo vim ~git/.ssh/authorized_keys# 将客户端的公钥添加进该文件(每行一个),然后保存、退出 Vim初始化 Git 存储库
xxxxxxxxxx# 创建一个名为 test 的 Git 存储库sudo mkdir -p ~git/git-repositorysudo git init --bare ~git/git-repository/test.gitsudo chown -R git:git ~git/git-repository/克隆 Git 存储库(在客户端执行)
xxxxxxxxxxgit clone git@192.168.56.111:/home/git/git-repository/test.git
3. 常规命令
3.1. git init [/path/to/your/respository]
创建空存储库或重新初始化已存在的存储库。Git 存储库是带有 objects、refs/heads、refs/tags 子目录,以及模版文件的 .git 目录。同时也将创建指向当前分支的 HEAD 文件。
重新初始化已存在的存储库是安全的,因为 git init 不会重写已存在的任何东西。重新运行 git init 的主要原因有:
- 将新增加的模版拷贝到 Git 存储库(执行
git init时,会将模版目录下的文件和目录 拷贝到 Git 存储库,可以通过--template选项或$GIT_TEMPLATE_DIR环境变量指定模版目录的路径) - 当指定
--separate-git-dir选项时,版本库将被移动到其它位置
git init 命令还有一个比较常用的选项:--bare。当指定该选项时,将创建一个裸存储库,裸存储库没有工作目录(Working Directory),只保存修订版本,可以直接作为服务器存储库。比如:
xxxxxxxxxx$ git init --bare test.gitInitialized empty Git repository in /home/git/git-repository/test.git/$ ls test.git/branches config description HEAD hooks info objects refs当未给 git init 命令指定路径时,缺省路径是当前目录(.)。
3.2. git remote
git remote 命令用于管理远程存储库:
git remote -v显示所有远程存储库的名称和 URLgit remote add <name> <url>添加远程存储库(name 是远程存储库的别名),比如:xxxxxxxxxxgit remote add origin git@192.168.56.111:/home/git/git-repository/test.gitgit remote rename <oldname> <newname>重命名远程存储库的名称(URL 不变)git remote remove <name>删除名称为 name 的远程存储库git remote set-url <name> <newurl>更改名称为 name 的远程存储库的 URL
3.3. git push
使用本地的引用更新远程存储库的引用,同时将发送相关的对象(在 git push 时,将在本地为远程分支建立远程追踪分支)。git push 的语法是:
xxxxxxxxxxgit push [<repository> [<refspec>...]]其中,repository 既可以是远程仓库的 URL,也可以是远程仓库的名称。
在 Git 中,分支(Branches)、标签(Tags)都是对 Commit 对象的引用。可以使用 git push 将分支或标签推送到远程存储库上。
refspec 参数的完整格式是:[+][[<src>]:]<dst>,它表示使用本地的 src 引用 更新远程存储库上的 dst 引用。当省略 src,而不省略冒号时,表示使用本地的空引用更新远程存储库的某个引用,也意味着删除远程存储库上的引用,比如:
xxxxxxxxxx# 将本地存储库的 master 分支推送到远程存储库 origin 的 development 分支$ git push origin master:development
# 删除远程存储库 origin 上的 development 分支$ git push origin :development
# 将本地存储库的 master 分支推送到远程存储库 origin 的 test-tag 标签$ git push origin master:refs/tags/test-tag
# 删除远程存储库 origin 的 test-tag 标签$ git push origin :refs/tags/test-tag
当同时省略 src 和冒号(“:”)时,会将名称为 dst 的本地引用推送到远程存储库的同名引用。比如:
xxxxxxxxxx# 创建本地分支 test-branch$ git branch test-branch
# 将本地分支 test-branch 推送到远程存储库 origin 的 test-branch 分支$ git push origin test-branch
向远程存储库推送分支时,可以使用 git push (-u|--set-upstream) <remote-repository> [<local-branch>:]<remote-branch> 将本地分支和远程分支关联起来。以后,在 <local-branch> 分支上,执行不带参数的 git push 时,会自动将 <local-branch> 推送到远程分支 <remote-repository>/<remote-branch>。比如:
xxxxxxxxxx# 将本地分支 test-branch 推送到远程存储库 origin 的 test-branch 分支,同时将本地分支和远程分支关联起来$ git push -u origin test-branch
# 接下来,直接执行 git push,而不必指定远程存储库名和分支名$ git push
在建立关联后,打开 .git/config 将发现类似下面的内容:
xxxxxxxxxx[branch "test-branch"]remote = originmerge = refs/heads/test-branch
3.4. git clone <remote-repository> [<directory>]
将远程存储库克隆到新创建的目录中。如果未指定 <directory> 参数,则使用远程存储库名去掉 .git 后缀作为目录名。git clone 除了将远程存储库完整地镜像下来外,还会做如下事情:
- 通过执行
git remote -v命令或查看.git/config文件,可以看到git clone命令自动地为远程存储库取“别名”:origin - 通过执行
git branch -r命令,可以看到git clone命令自动地在本地为远程存储库的每个分支创建远程追踪分支 - 通过执行
git branch -vv命令或查看.git/config文件,可以看到git clone命令自动地将本地存储库的 master 分支和远程存储库的 master 分支建立关联
4. Git 暂存区
暂存区也被称为 index 或 stage,它是介于工作目录(Working Direcotry)和 Git 目录(Git Directory,即 .git 目录)之间的中间状态,许多 Git 命令涉及到暂存区的概念,比如 git commit、git add、git diff、git status 等。
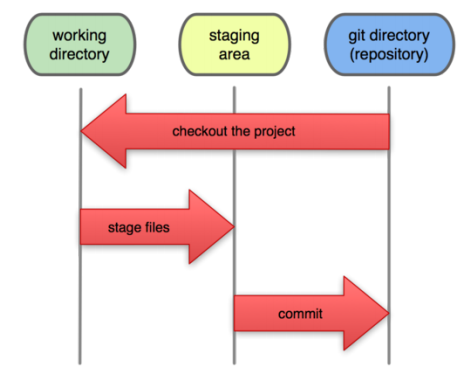
说明:
- 使用
git checkout将存储库中的内容检出到工作目录 - 使用
git add将工作目录中的修改更新到暂存区 - 使用
git commit将暂存区中的内容提交到存储库 - 当执行
git add时,不仅会在 Git 对象库(位于.git/objects目录)中,创建保存文件内容的 blob 对象;还将该 blob 对象的 ID 记录到暂存区的文件索引中 - 当执行
git commit时,会将暂存区的目录树写到 Git 对象库中,同时当前分支将指向新生成的 commit 对象 - 当执行
git diff时,其实比较的是工作目录和暂存区的差异 - 当执行
git rm --cache <filename>时,直接从暂存区中删除文件,工作目录不会发生改变
暂存区保存的是包含文件索引的目录树。该目录树中记录文件名、文件的状态信息(时间戳、文件长度等),以及文件对应的 blob 对象的 ID。暂存区保存在 .git/index 文件中。Git 存储库的结构如下图所示:
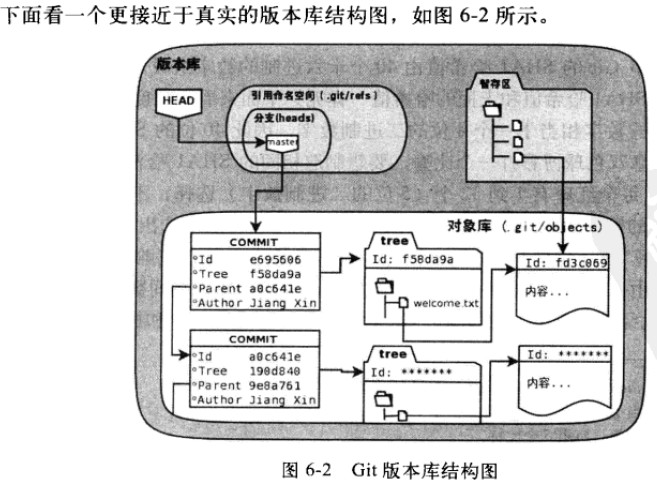
其中,HEAD 指向当前所在的分支,而分支(和标签)则是指向 commit 对象的引用。
5. Git 底层存储
Git 底层存储的是文件快照,也就是整个文件的内容。而不是一个版本相对于另一版本的差分。
在 Git 中,有四类对象:blob、tree、commit、tag。Git 对象存储在对象库中(位于
.git/objects目录)。
5.1. blob 对象
blob 对象用于存储文件内容,值得注意的是:blob 只保存文件内容,忽略其它元数据,比如文件名、路径等。blob 对象的 ID 是文件内容的 SHA1 值。可以使用 git hash-object <filename> 命令计算文件内容的 SHA1 值,假设文件内容的 SHA1 值是 95f8cd0ca82c7d33423d8fb9b52bf6995eec3757,那么对应的 blob 对象存储在 .git/objects/95/f8cd0ca82c7d33423d8fb9b52bf6995eec3757 文件中。当执行 git add <filename> 命令时,将生成相应的 blob 对象(也会将 blob 对象的 ID 更新到暂存区的文件索引中)。
可以使用 git cat-file -t <SHA1值>,查看对象的类型。使用 git cat-file -p <SHA1值>,查看对象的内容。比如:
xxxxxxxxxx$ git cat-file -t 95f8cd0ca82c7d33423d8fb9b52bf6995eec3757blob$git cat-file -p 95f8cd0ca82c7d33423d8fb9b52bf6995eec3757...5.2. tree 对象
每次提交时(即执行 git commit 时),将生成一个 tree 对象(当然也生成一个 commit 对象),tree 对象代表当次提交时的目录信息,其内容包含:
- 该目录下的文件的文件名,及其对应的 blob 对象
- 该目录下的子目录的目录名,及其对应的 tree 对象
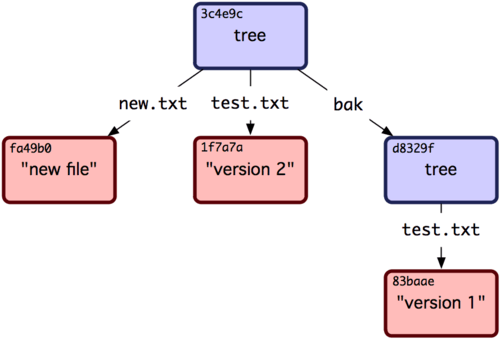
从项目根目录开始,每个目录都对应一个 tree 对象,因为目录具有层级关系,所以 tree 对象具有包含关系。比如:
xxxxxxxxxx# 获取当前分支所指向的 commit 对象$ git rev-parse HEAD9836fb0b78ecd9006b6575c361fd4e3d7642d31d
# 查看 commit 对象的内容,其中包含项目根目录对应的 tree 对象$ git cat-file -p 9836fb0b78ecd9006b6575c361fd4e3d7642d31dtree 7bcdfcafe040d3c35240445aea8cafeb8db7067cparent c20fc0e94630718b35b3ef50964b6c8269876c21author ...committer ...
...
# 查看项目根目录对应的 tree 对象,可以看到其中包含文件名及其对应的 blob 对象,子目录名及其对应的 tree 对象。# 在本例中,a、d 是项目根目录下的文件,b 是项目根目录下的子目录$ git cat-file -p 7bcdfcafe040d3c35240445aea8cafeb8db7067c100644 blob 95f8cd0ca82c7d33423d8fb9b52bf6995eec3757    a040000 tree 2aaf3de65932e828fbcdd5a09085f1277a4c0e81    b100644 blob 41ea8d852675618eb71cc40abbff3b5a2cd53d4e    d
# 继续查看子目录 b 对应的 tree 对象包含什么$ git cat-file -p 2aaf3de65932e828fbcdd5a09085f1277a4c0e81100644 blob 5e5e2c3d099404a4e6badbbf030b261faf4a9fa3    c
# 从命令的运行结果中,可以看到子目录 b 下,不再包含子目录,并且有一个名为 c 的文件
下面是 tree 对象包含 tree 对象的示例:
5.3. commit 对象
每次提交时(即执行 git commit 时),将生成一个 commit 对象(同时也生成一个 tree 对象)。commit 对象中包含:
- 作者、提交者、提交日期、提交日志等
- 父 commit,父 commit 可能有多个,比如在
git merge时,将产生新 commit 对象,该 commit 对象有 2 个父 commit。如果只在当前分支上进行修改,然后提交,那么父 commit 就是该分支的上一次 commit - tree 对象,它记录当次提交时,项目根目录的信息
下面看一个示例:
xxxxxxxxxx$ git cat-file -p HEADtree 8e975d674b20c62f13ef9e3d469b038dd4f67ab7parent 9836fb0b78ecd9006b6575c361fd4e3d7642d31dauthor ...committer ...
...
5.4. tag 对象
tag 对象其实是为 commit 对象起一个更易读的名字。
6. Git 分支
6.1. 本地分支(local branch)
本地存储库上的分支
可以通过
git branch <new-branch-name> [<start-point>]或git checkout -b <new-branch-name> [<start-point>]创建本地分支- 如果 <start-point> 是远程跟踪分支,那么以上两条命令将自动地在新创建的本地分支和远程跟踪分支对应的远程分支之间建立关联(即追踪分支)
6.2. 远程分支(remote branch)
- 远程存储库上的普通分支,比如 192.168.56.111:/home/git/git-repoistory/test.git 上的 test-branch 分支
- 可以使用
git push [(-u|--set-upstream)] <remote-repository-name-or-url> [+][[<local-branch-name>]:]<remote-branch-name>建立或更新远程分支
6.3. 远程跟踪分支(remote-tracking branch)
- 本地存储库用它记录远程存储库的某个远程分支的状态(即指向哪一个 commit 对象)。远程跟踪分支以“<存储库名>/<分支名>”的形式命名。远程跟踪分支在本地是只读的,用户无法修改其指向,其指向将在用户与远程存储库通信时自动地改变,比如当用户执行
git fetch或git pull等从远程存储库获取数据的操作时 - 可以通过
git branch -r查看所有远程跟踪分支 - 可以通过
git pull <remote-repository-name-or-url> <remote-branch>或git fetch <remote-repository-name-or-url> <remote-branch>在本地存储库创建远程跟踪分支
6.4. 跟踪分支(tracking branch)
跟踪分支为本地分支和远程分支建立关联。这样在执行
git pull、git push时,Git 可以自动地识别去从哪个远程存储库的哪个分支拉取数据或将数据推送到哪个远程存储库的哪个分支在本地分支和远程分支之间建立关联的方式有很多,比如:
git push (-u|--set-upstream) ...git checkout -b ...git branch (--set-upstream-to=<upstream> | -u <upstream>) [<branchname>]
可以通过
git branch -vv命令,查看本地分支和远程分支之间的超前落后情况可以通过
.git/config文件,查看本地分支和远程分支之间的关联关系
7. 分支合并
7.1. git merge
git merge 用于分支合并,它用于把其它分支或 commit 的内容合并进当前分支。下面用一个实例进行说明:
1,在 master 分支上创建测试文件 git_merge_test.txt。
xxxxxxxxxx$ git init git_merge_test.git$ cd git_merge_test.git/$ echo "line 1" >> git_merge_test.txt$ git add git_merge_test.txt$ git commit -m "this is the first commit on master" git_merge_test.txt$ echo "line 2" >> git_merge_test.txt$ git commit -m "this is the second commit on master" git_merge_test.txt2,以 master 分支为起点,创建新分支 test-git-merge-branch。
xxxxxxxxxx$ git branch test-git-merge-branch master$ git branch* master test-git-merge-branch$ git checkout test-git-merge-branchSwitched to branch 'test-git-merge-branch'$ echo "line 3" >> git_merge_test.txt$ git commit -m "this is the first commit on test-git-merge-branch" git_merge_test.txt3,切换到 master 分支,修改文件,再将 test-git-merge-branch 上的修改 merge 进 master 分支。
xxxxxxxxxx$ git checkout masterSwitched to branch 'master'$ echo "line 4" >>git_merge_test.txt$ git commit -m "this is the third commit on master" git_merge_test.txt$ git merge test-git-merge-branchAuto-merging git_merge_test.txtCONFLICT (content): Merge conflict in git_merge_test.txtAutomatic merge failed; fix conflicts and then commit the result.$ git status -sUU git_merge_test.txt4,可见存在冲突,因为两个分支都修改了同一个文件的同一行。
xxxxxxxxxx$ cat git_merge_test.txtline 1line 2<<<<<<< HEADline 4=======line 3>>>>>>> test-git-merge-branch其中,“=======”分隔符上面的部分是 HEAD 分支(即当前所在的分支 master)的内容;下面的部分是 test-git-merge-branch 分支中的内容。接下来,人工解决冲突,比如:
xxxxxxxxxx$ cat git_merge_test.txtline 1line 2line 4line 3然后使用 git add 将冲突标记为已解决:
xxxxxxxxxx$ git add git_merge_test.txt$ git status -sM git_merge_test.txt最后,使用 git commit 进行提交:
xxxxxxxxxx$ git commit -m "merge from test-git-merge-branch"[master 7b0149e] merge from test-git-merge-branch可以使用 git log --graph [<filename>],查看文件的分支合并图。
在 git merge 的过程中,Git 将进行一些特殊处理:找到两个分支的末端和它们的共同祖先,然后进行三方合并,之后对三方合并的结果做快照,创建指向它的 commit 对象。
7.2. git rebase
在 git push 时,Git 将比较 Commit History,如果 Commit History 不一致,Git 将拒绝提交(比较危险的做法是:使用 git push -f 将远程存储库上的分支强制更新为本地存储库的。但是,这样做会影响其他人的工作!)。
可以使用 git rebase 解决这种情况。接下来用一个示例进行讲述。
1,在测试服务器上创建空的存储库。
xxxxxxxxxx$ cd /home/git/git-repository/$ git init --bare test-rebase.git$ sudo chown -R git:git test-rebase.git2,构造需要 rebase 的现场。
xxxxxxxxxx$ git clone git@192.168.56.111:/home/git/git-repository/test-rebase.git test-rebase-1$ git clone git@192.168.56.111:/home/git/git-repository/test-rebase.git test-rebase-2
$ cd test-rebase-1/$ echo "this is line 1" >> text$ git add text$ git commit -m "the first commit" text$ git push -u origin mainEnumerating objects: 3, done.Counting objects: 100% (3/3), done.Writing objects: 100% (3/3), 240 bytes | 240.00 KiB/s, done.Total 3 (delta 0), reused 0 (delta 0), pack-reused 0To 192.168.56.111:/home/git/git-repository/test-rebase.git * [new branch]      main -> mainbranch 'main' set up to track 'origin/main'.
$ echo "this is line 2" >> text$ git commit -m "the second commit on test-rebase-1" text
# 注意:commit 后没有执行 git push!
3,切换到 test-rebase-2,先将 main 分支更新到最新状态,然后修改、提交、推送。
xxxxxxxxxx$ cd ../test-rebase-2/$ git pull origin main$ echo "this is line 3" >> text$ git commit -m "the first commit in test-rebase-2" text$ git push4,回到 test-rebase-1,将之前的 commit 推送到远程存储库。
xxxxxxxxxx$ cd ../test-rebase-1/$ git pushTo 192.168.56.111:/home/git/git-repository/test-rebase.git ! [rejected] main -> main (fetch first)error: failed to push some refs to '192.168.56.111:/home/git/git-repository/test-rebase.git'hint: Updates were rejected because the remote contains work that you dohint: not have locally. This is usually caused by another repository pushinghint: to the same ref. You may want to first integrate the remote changeshint: (e.g., 'git pull ...') before pushing again.hint: See the 'Note about fast-forwards' in 'git push --help' for details.git push 被拒绝。
5,使用 git fetch(不是 git pull,git pull = git fetch + git merge)将远程追踪分支的状态更新到与远程存储库相同。
xxxxxxxxxx$ git fetch origin mainremote: Counting objects: 5, done.remote: Total 3 (delta 0), reused 0 (delta 0)Unpacking objects: 100% (3/3), 269 bytes | 134.00 KiB/s, done.From 192.168.56.111:/home/git/git-repository/test-rebase * branch main -> FETCH_HEAD 53bb5a0..fbe0d4b main -> origin/main6,开始 rebase。
xxxxxxxxxx$ git rebase origin/mainAuto-merging textCONFLICT (content): Merge conflict in texterror: could not apply e8dc503... the second commit on test-rebase-1hint: Resolve all conflicts manually, mark them as resolved withhint: "git add/rm <conflicted_files>", then run "git rebase --continue".hint: You can instead skip this commit: run "git rebase --skip".hint: To abort and get back to the state before "git rebase", run "git rebase --abort".Could not apply e8dc503... the second commit on test-rebase-1$ git status -sUU text
可见 rebase 时发生冲突。如果想要停止 git rebase,可以使用 git rebase --abort。
7,打开发生冲突的文件 text,人工解决冲突,然后使用 git add 将该冲突标记为 resolved。
xxxxxxxxxx# 假设已经解决冲突$ git add text8,使用 git rebase --continue,继续解决下一个冲突,直到解决所有冲突(注意,无需 git commit)。
xxxxxxxxxx$ git rebase --continue$ git status -s9,使用 git log --graph 查看 Commit History。
xxxxxxxxxx$ git log --graph text可见 Commit History 是线性的,非常清晰。
git rebase <another> 的流程是:
- 将当前分支的所有 commit 取消,将它们保存为补丁(这些补丁被放在
.git/rebase-apply/目录) - 将当前分支更新为 <another>
- 将补丁应用到当前分支上
7.3. git cherry-pick
git cherry-pick 可以选择一个分支的一个或多个 commit 进行合并。相比之下,git merge 可以称为完全合并。比如,线上的分支是 v1.0,正在开发的分支是 v2.0,如果只想把 v2.0 的某些但不是全部特性合并到线上分支 v1.0,那么应该使用 git cherry-pick,而不是 git merge。因为 git merge 会将 v2.0 上所有的改动都合并到 v1.0,最终导致版本混乱。下面用一个示例,进行说明。
1,构造测试场景。
xxxxxxxxxx$ git init test-cherry-pick$ cd test-cherry-pick/$ git checkout -b v1.0$ echo "this is feature 1" >>feature1$ git add feature1$ git commit -m "this is feature 1" feature1$ echo "this is feature 2" >>feature2$ git add feature2$ git commit -m "this is feature 2" feature2
$ git branch v2.0 v1.0$ git checkout v2.0$ echo "new functions of feature 1" >>feature1$ git commit -m "new functions of feature 1" feature1$ echo "this is feature 3" >>feature3$ git add feature3$ git commit -m "this is feature 3" feature3
现在,只想把 v2.0 中对 feature 1 的修改合并进 v1.0。不想将 feature 3 合并到 v1.0。
2,通过 git log 找到要合并的 commit ID。
xxxxxxxxxx$ git log --pretty=onelined67563d1bd217eef5f731ba8f74706d462b710a2 (HEAD -> v2.0) this is feature 3659ac7a541d8a2d61d1897a398f9255115f94f6a new functions of feature 12b44c0079b5894b964d68b490e17ae170f8cb611 (v1.0) this is feature 2ed05aeca21d0245bfd3560935ce0f741aed98721 this is feature 1要合并进 v1.0 的 commit ID 是 659ac7a541d8a2d61d1897a398f9255115f94f6a。
3,使用 git cherry-pick 进行合并。
xxxxxxxxxx$ git checkout v1.0$ git cherry-pick 659ac7a541d8a2d61d1897a398f9255115f94f6a[v1.0 fbedccf] new functions of feature 1 Date: Thu Feb 9 13:20:30 2023 +0800 1 file changed, 1 insertion(+)执行 git cherry-pick 时,可能出现冲突。解决方法与 git merge 一样。
8. 回滚
8.1. git revert
通过生成新提交的方式,撤销某些已经存在的提交。git revert 不会改变 Commit History(这很重要,因为 git push 时,Git 将比较 Commit History,如果 Commit History 不一致,那么将导致 Push 被拒绝)。
下面继续使用讲述 git cherry-pick 时使用的存储库。
1,通过 git log 找到要撤销的 commit。
xxxxxxxxxx$ git checkout v2.0$ git log --pretty=onelined67563d1bd217eef5f731ba8f74706d462b710a2 (HEAD -> v2.0) this is feature 3659ac7a541d8a2d61d1897a398f9255115f94f6a new functions of feature 12b44c0079b5894b964d68b490e17ae170f8cb611 this is feature 2ed05aeca21d0245bfd3560935ce0f741aed98721 this is feature 1假设想要撤销的 commit 是 659ac7a541d8a2d61d1897a398f9255115f94f6a。
2,创造在 git revert 时,产生冲突的场景。
xxxxxxxxxx# 先将 feature1 的第二行改成:# new functions of feature 1 with suffix
$ git commit -m "add a suffix" feature1
3,开始 git revert。
与 git rebase 类似,git revert 也可能产生冲突。当产生冲突时,可以通过 git revert --abort 结束 Revert;也可以人工解决冲突,解决完成后,使用 git add 将冲突标记为“已解决”,然后使用 git revert --continue 继续 Revert,直到所有冲突都被解决,git revert 完成。在整个过程中,无需 git commit。
xxxxxxxxxx$ git revert 659ac7a541d8a2d61d1897a398f9255115f94f6aAuto-merging feature1CONFLICT (content): Merge conflict in feature1error: could not revert 659ac7a... new functions of feature 1hint: After resolving the conflicts, mark them withhint: "git add/rm <pathspec>", then runhint: "git revert --continue".hint: You can instead skip this commit with "git revert --skip".hint: To abort and get back to the state before "git revert",hint: run "git revert --abort".$ git status -sUU feature1# 手工解决冲突$ cat feature1this is feature1with a suffix$ git add feature1$ git revert --continue# 查看 Commit History$ git log --graph feature1通过 git log,可以看到 git revert 没修改 Commit History,而是产生一个新 commit。
8.2 git reset
分支和标签其实是指向 commit 对象的引用,可以通过 git reset 重置(Reset)当前分支指向的 commit。
git reset 有两个重要的选项:--soft(默认)、--hard:
git reset --soft:仅改变当前当前分支的指向,不改变工作目录和暂存区git reset --hard:不仅改变当前分支的指向,还会重置工作目录和暂存区,丢弃所有改动
仍然以上面的存储库为例,进行说明。
xxxxxxxxxx$ git log --pretty=oneline9e334588da82193d94da65cc0e855b06dbfae253 (HEAD -> v2.0) Revert "new functions of feature 1"3937a33447117e2cb12529be37ca2f3025885234 add a suffixd67563d1bd217eef5f731ba8f74706d462b710a2 this is feature 3659ac7a541d8a2d61d1897a398f9255115f94f6a new functions of feature 12b44c0079b5894b964d68b490e17ae170f8cb611 this is feature 2ed05aeca21d0245bfd3560935ce0f741aed98721 this is feature 1$ git reset --hard Head~1HEAD is now at 3937a33 add a suffix$ git log --pretty=oneline3937a33447117e2cb12529be37ca2f3025885234 (HEAD -> v2.0) add a suffixd67563d1bd217eef5f731ba8f74706d462b710a2 this is feature 3659ac7a541d8a2d61d1897a398f9255115f94f6a new functions of feature 12b44c0079b5894b964d68b490e17ae170f8cb611 this is feature 2ed05aeca21d0245bfd3560935ce0f741aed98721 this is feature 1可以看到 git reset 引起 Commit History 的改变,所以在 git push 时,可能被拒绝。
8.3. git stash
许多 Git 命令要求工作目录是“干净”的,比如 git revert、git merge 等。如果在执行这类命令时,工作目录上已有改动,但是既不想丢弃,也不想提交,那么就可以使用 git stash 将这些未提交的改动“暂存”起来(存在 .git/refs/stash),可以使用 git stash 多次保存工作进度;还可以通过 git stash list 显示进度列表;使用 git stash pop [<stash>] 恢复工作进度;使用 git stash drop [<stash>] 删除工作进度。
仍然以上面的存储库为例,进行说明。
xxxxxxxxxx$ lsfeature1  feature2  feature3$ echo "another line of feature1" >>feature1$ git stashSaved working directory and index state WIP on v2.0: 3937a33 add a suffix$ echo "another line of feature2" >>feature2$ git stashSaved working directory and index state WIP on v2.0: 3937a33 add a suffix# 最新的工作进度排在上面$ git stash liststash@{0}: WIP on v2.0: 3937a33 add a suffixstash@{1}: WIP on v2.0: 3937a33 add a suffix$ echo "another line of feature3" >>feature3$ git stashSaved working directory and index state WIP on v2.0: 3937a33 add a suffix$ git stash liststash@{0}: WIP on v2.0: 3937a33 add a suffixstash@{1}: WIP on v2.0: 3937a33 add a suffixstash@{2}: WIP on v2.0: 3937a33 add a suffix$ git stash drop stash@{0}Dropped stash@{0} (73b1dff3267f88dd43069cd17ed346682e0fb913)$ git stash pop stash@{1}On branch v2.0Changes not staged for commit:  (use "git add <file>..." to update what will be committed)  (use "git restore <file>..." to discard changes in working directory)  modified:   feature1
no changes added to commit (use "git add" and/or "git commit -a")Dropped stash@{1} (a3856bb6677a70f2bd666a2d729660c4bfccd216)$ git stash popOn branch v2.0Changes not staged for commit:  (use "git add <file>..." to update what will be committed)  (use "git restore <file>..." to discard changes in working directory)  modified:   feature1  modified:   feature2
no changes added to commit (use "git add" and/or "git commit -a")Dropped refs/stash@{0} (95166d2167ae6abbef0fd689743542e76d5766da)
8.4. git checkout
git checkout 的作用是将存储库中特定的修订版本检出到工作目录(切换分支),也可以利用它撤销未提交的修改。
xxxxxxxxxx$ git status -s M feature1 M feature2$ git checkout feature1$ git status -s M feature2$ git checkout .$ git status -s9. 归档
对于 Java 项目,部署到线上的是 jar 包或 war 包。但对于 Python、PHP 等项目,部署到线上的可能是源代码。此时,我们不希望代码目录中包含与存储库相关的文件(比如 SVN 中的 .svn 目录、Git中的 .git 目录)。对于 SVN,可以使用 svn export 命令。对与 Git,则可以使用 git archive 命令。
xxxxxxxxxxgit archive [--format=(tar|zip)] [-o <outputfile> | --output <outputfile>] <tree-ish> [<path> ...]--format用于指定结果文件的格式,tar 或 zip-o或--output用于指定输出文件的名称- 关于 <tree-ish>,请参考这篇文档
- <path>(可省)用于指定将哪些文件归档
比如:
xxxxxxxxxx$ lsfeature1 feature2$ git archive --format=zip -o myproject.zip HEAD$ lsfeature1 feature2 myproject.zip